
Home Made Dew Control System for a Telescope
Dew is one of the astronomer's worst enemies. If no precautions are taken - dew can easily ruin a perfect observing night, as it forms on mirrors and lenses. All telescopes are subject to "the dew problem". Open tube reflectors (for example Newtonians) have some advantage over refractors or catadioptrics, since their main mirror is well protected. However their secondary mirrors get dewed quite easily. Therefore it's mandatory for almost every amateur astronomer to have some kind of dew control solution for his equipment.
The Theory
Dew can form on surfaces when they get cooler than the ambient temperature, below a certain "dew point" (which depends on humidity). When a surface is pointed up, into the sky, it radiates its heat away (mainly via infrared) but receives almost nothing in return. As a result its temperature can drop low enough for the dew to form. A surface which is pointed down, into the ground, also radiates. However the ground radiates back on the surface, and some sort of equilibrium is reached. That is the reason why dew is formed more easily on unshielded surfaces pointing upwards (as a contrary to a common belief that dew is "slowly falling down" like a rain).
The Solution - Dew Heater
There are several approaches to dew control: Dew shields or dew caps, blowing hot air from time to time, etc. I'm using the third approach, which is the most effective one: Heating the optical surface above the dew point.
There are a lot of commercial solutions for heating, of various prices and complexity. Some of the companies which offer them: "Astrozap", "Kendrick", "Thousand Oaks", "Dew Buster". I've went for a simple, home-made solution, which closely resembles "Astrozap" products.
My system is based on PWM 4 channel dew controller, 10Ah Lithium-Ion battery, and several heating elements used for: Newtonian secondary mirror, 2" and 1.25" eyepieces, finder and the objective lens of 80mm refractor. The controller itself isn't a mandatory component, since the heaters can be plugged directly into any 12v power source. However it's very useful to have variable power.
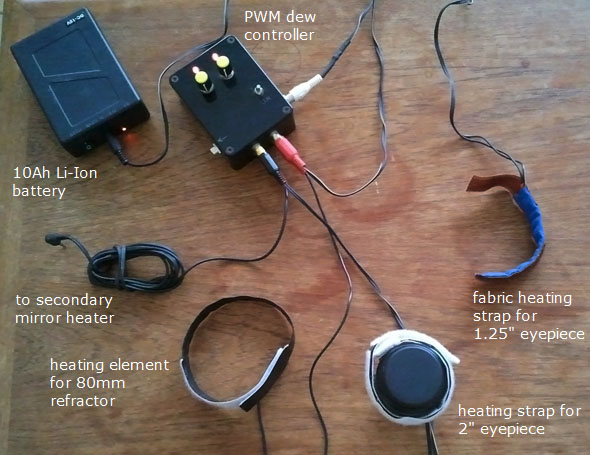
Home made dew removal system for a telescope with a controller and heating straps
The overall cost of components for making this setup (excluding the battery) was approximately 25$. Similar commercial solution would be around 250-300$.
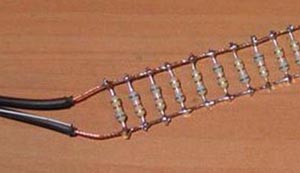
Nichrome Heating Straps:
I used nichrome heating straps, as a better alternative to resistors. Nichrome is an alloy with high electrical resistance, and commonly used in heating elements. The idea is to use loops of Nichrome wire of specific length (a "heating loop"). Each loop has a specific resistance, and will draw a specific current from a 12V source.
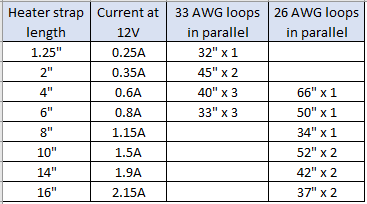
Recommended currents and nichrome wire lengths
It's important to make sure that the wire doesn't get too hot. If you require more power but the calculations show your are getting high temperatures - just combine two longer loops in parallel. You can use the following table I prepared for different heating elements for a 33 and 26 AWG wires, which ensures that the wires will remain under 60°C at room temperatures. In any case, after you assembled the heater, it's a good idea to test it at full power and make sure it's not setting your telescope on fire.
The overall process of making the heating element looks like this:
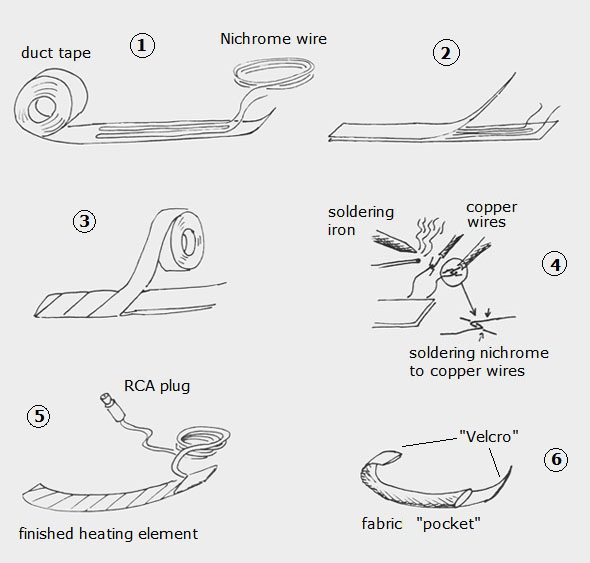
Making heating straps from a nichrome wire and a duct dape
Step 1:
I put a duct tape stripe of required length on a table, with the sticky part facing upwards. Then carefully placed the pre-cut Nichrome wire on it, making sure that there are no overlaps (see the drawing). The loop should begin and end at the same side of the stripe. In case there is difficulty to insulate parts of the loop one from another - another layer of duct tape can be attached.
Step 2: Cut another stripe of duct tape and cover the wires with it. Make sure both stripes are firmly held together.
Step 3: I like to wrap the whole thing around with duct tape one more time.
Step 4: Connecting cable copper wires to nichrome - this can be a little bit tricky. I made a small "V" folds on both copper and the nichrome, "hooked" them together and pressed the endings. After that I soldered the junction. Note that the wire can come with some sort of "coating" and needs to be scrubbed with a sharp knife, or a sand paper, before the soldering procedure.
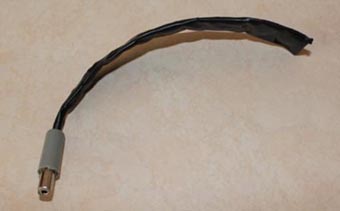
Step 5: At the end of the cable I connected a RCA plug (the type which is used for component video).
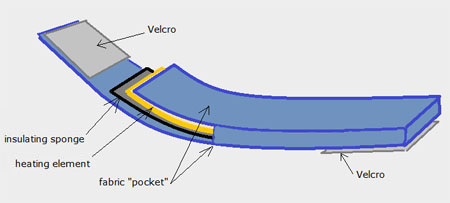
The heating element inside a fabric pocket
Step 6: It's best to sew a fabric strap with some kind of "pocket" for the heating element, and fix it with some velcro stripes. Using a sponge insulation (on the outer side of the heating element) is a good idea to prevent heat loss. If there is no sewing option - then simply attach an adhesive velcro stripe to the heating element.
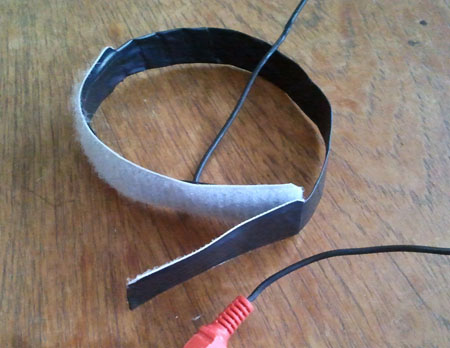
A simple heating element with a velcro stripe
It's a good idea to test the strap for a few minutes on full power, to make sure it doesn't overheat. If it does - use longer loops and make sure the wire is well insulated inside the strap and doesn't overlap. If you are really paranoid about setting your telescope on fire - apply a layer of insulating tape over each loop of the wire.
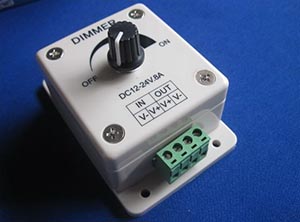
PWM Dew Controller
This is a simple PWM 4 channel controller I made. PWM (pulse width modulation) is an efficient technique to control power. There are a lot of variants of dew controller schematics over the internet. Mine is functionally similar to controller made by Astrozap, and is compatible to their heaters.
It features 4 output channels, with two pairs controlled separately, On/Off switch and a 6V output socket (which I needed for my previous telescope).
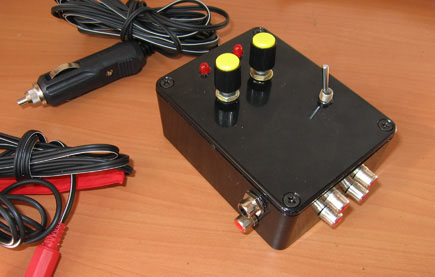
12V dew controller with 4 channels and PWM regulation
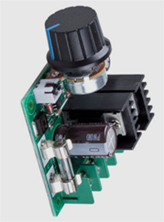
It's based on a 556 dual timer chip, 2 TIP31 and 2 2N2222 transistors, 2 red LEDs, 6 RCA female connectors, power switch, two potentiometers, a small project box and a few discrete components. Circuit is assembled on a small wire-wrap board.
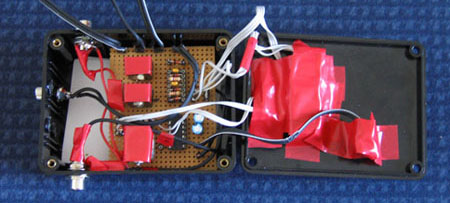
Dew controller assembled using a wire-wrap breadboard
This is the schematics. Note that LM7806 6V regulator can be discarded, since it was used specifically to power my Skyview Pro mount.

Specifications:
input: 8-18V (recommended 12V).
output: same as input, pulsed.
connector type: RCA (component video type).
maximum current for each pair of channels: 3A (1-2A recommended).
Notes:
H1-H2 and H3-H4 channels are paired. The LEDs for each channel pair will blink slowly, according to supplied power. When the LED is always "on" - then full power is supplied to heaters in corresponding channel pair.
Since this controller has no feedback (no temperature settings) - a care should be taken not to overheat the optics.
Also i'ts highly recommended to use a 3-5A fuse (not shown in schematics). I'm using this controller for over 8 years.
Dew Controller Ebay Alternatives
A cheap PWM dimmer from China
A PWM motor controller
Recently some really cheap (~5$) 12V dimmers and other controllers became available on Ebay. You can search for the following keywords: "12v PWM controller" or "12v dimmer". They are also based on PWM technique (do not waste power) and can be used as an alternative to commercial or home-made dew controllers. Just make sure that the output current rating (Amperes) is enough for all of your heaters.
Heating straps from resistors
If you can't find a nichrome wire - you can use a "ladder" of resistors as a heating element. Overall heater power between 1 to 4 watts should be enough, depending on conditions. You can use data from commercial heating straps in order to determine the required power.
Dew heating straps can be made from a ladder of resistors
Power (P) of a resistor "ladder" is calculated the following way:
P = ( Supply voltage ^ 2 ) / ( resistor value / number of resistors ) .
Number of resistors and their value may vary according to size of the straps, applied voltage, and expected ambient temperature.
To prevent overheating - make sure that actual power on each resistor doesn't approach their maximum rated power (usually 0.25 or 0.5 W). The actual power is calculated by dividing the overall power of heater element by number of resistors (if they are connected in parallel).
Secondary Mirror Heater
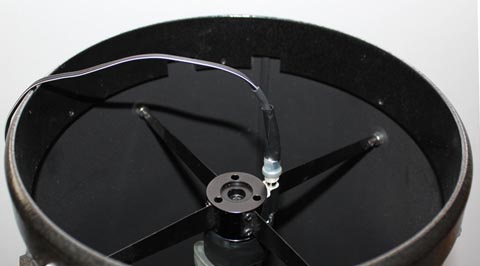
There are 2 ways of heating the secondary mirror of Newtonian telescope: Attach some sort of heating element to back of the mirror itself, or wrap a heating strap around mirror holder. I decided to permanently attach a heating strap with a power connector to the mirror holder, in a way it doesn't interfere with telescope's aperture.
Heating element can be made from nichrome wire, in a way mentioned above, or from resistors. I've used both of these methods for different telescopes. This is an example of a 3 watt heating strap for secondary mirror of my 8" Newtonian:
Complete heating element for a secondary mirror
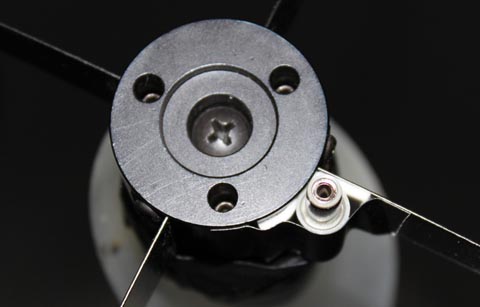
A power connector attached to the secondary mirror holder
The wire which goes to the heating element won't affect the image noticeably
I also put some flocking paper around the strap, in order to prevent unwanted reflections from the duct tape. A more elegant way of powering the heater would be to conduct electricity directly through the spider vanes, however this requires insulating at least one of them.