
How to Observe the Sun and the Solar Eclipse Safely
Introduction and Safety Notice
Sun is extremely bright and can not be observed with unaided eye safely
The Sun is the closest and the brightest star in our sky and it is a rewarding observing target. Depending on the method and the instrument used - it can reveal beautiful features such as sunspots, granulation, corona (during full solar eclipses), prominences and filaments (observable with a higher end instruments).
However being extremely bright, 400000 times brighter than the full Moon, the Sun poses a significant risk to our sight if observed improperly. Normally we can't look at the Sun for more than a few seconds since our eyes are forced to close to protect themselves. However using improvised and improper filters can reduce the visible glare while letting enough harmful IR radiation through. This way we can "fool" our eyes and allow them to stay open long enough for this radiation to harm our eyesight. Using optical aids such as binoculars or telescopes without dedicated solar filters is even more dangerous, since they focus and multiply the amount of radiant energy which enter the pupil and can cause damage even during a brief exposure (i.e. a 50 mm binocular collects 600 times more light than a naked eye).

Unlike other improvised methods - welder's glass number 14 is considered safe
Therfore if you wish to stay on the safe side - you should avoid improvised solutions (such as CD, floppy disk, smoked glass, negative films, etc.) and only use filters and equipment which was specifically designed for visual solar observing. You can also use the projection method (described below) or look through a number 14 welder's glass which is considered safe (only is observing without a telescope!). If you still wish to read about improvised solutions - you can look into one of these articles: NASA - Eye Safety During Solar Eclipses, Eclipse Filters - Time for an International Standard.
Direct Solar Observing Methods
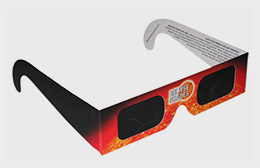
You may obtain "eclipse glasses" at public observing events or in internet stores
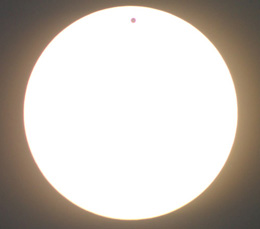
The Sun is only safe to observe directly while using some kind of a solar filter. "eclipse shades" or "eclipse viewer" are cheap and allow you to view the Sun safely during long periods of time. You can also use a welder's glass with a shade number 14 as mentioned above.
Direct viewing is useful for observing solar eclipses, but it won't show you any sunspots or other details (except the largest of sunspots, which are quite rare). In 2012 this method could also be used to observe a spectacular event of the Venus transit, but sadly the next one will occur only at 2117.
Solar Projection Methods
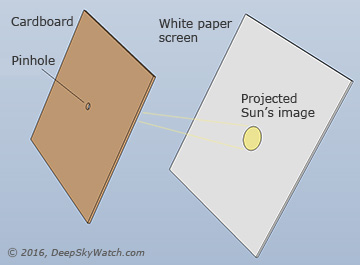
Pinhole projection of the Sun can be performed with the simplest tools, but the image will be quite small
If you aren't able to obtain a proper eclipse viewer - the pinhole projection method is the simplest and the safest one. This method is only useful for observing phases of a solar eclipse, since the image is small and won't reveal any solar "surface" features.
The simplest projector is a piece of a thin cardboard with a small pinhole punctured in it. Behind the cardboard you should place a sheet of a white paper on which the solar image will be projected. The further the distance between the pinhole and the projection screen is - the larger and the fainter the image will be. The same goes for the pinhole diameter - the smaller it gets, the sharper and the fainter the image will be. Note that if it's too small - the diffraction effects can become dominant and the image will be blurred in addition to being faint. You may start with a diameter of 0.5mm and then experiment. To get higher contrast - try projecting the Sun in a dark room through a pinhole located on a curtained window rather than outdoors.
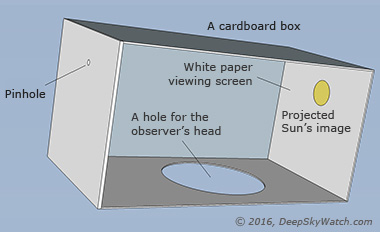
Projection box is an improvement over the simple pinhole projection method which provides higher contrast
Even further improvement can be achieved using a long, fully enclosed cardboard box with a round hole in which the observer should insert his head. One of the inner sides of this box is covered with a white paper (a projection screen). At the opposite side a pinhole is punctured (near the top, so the observer's head won't interfere). For higher quality image - instead of puncturing a hole in the cardboard you can make a square cutout and cover it with an aluminum foil, in which you should accurately puncture a round pinhole with a needle. The observer should be facing the projection screen.
Another variation of the projection method is a masked mirror with an exposed ~5mm spot. The mirror should be placed outside and reflect the solar image onto projection screen located in a darkened room. The method will produce a much larger image and it is described in this article.
There are commercially available projection devices which are usually cheap and include some kind of optics (i.e. Solarscope). They produce a brighter, largrer view and are great for showing eclipse to public.
Projection with a Telescope or Binoculars
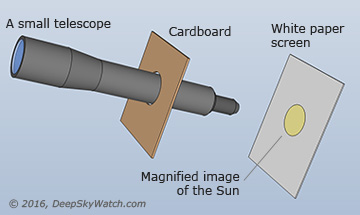
A projection using a small telescope or binoculars can provide much larger, brighter and sharper image of the Sun
A small, cheap telescope (or binoculars) without a solar filter can be used to project the Sun's image onto a white screen. Obviously it is strictly forbidden to look through the eyepiece while aiming the telescope - not even briefly. Just move it around until you see the Sun's image appear on the projection screen. A cardboard blocking screen can be used in order to block the direct sunlight and increase contrast (see illustration). Achieve rough focusing by moving the projection screen further or closer to the eyepiece, and then fine focus using the focuser knob.
It is highly recommended to use only small telescope for solar projection (under 80mm), since the gathered sunlight may easily damage the internal components of a larger one. I'd also avoid using this method with expensive, higher end instruments regardless of their aperture, since you never know where exactly the light might focus inside the instrument and damage it.
While using telescope projection - the instrument should never be left unattended, since a baypasser (or a child) may accidently look through it, or a fire might start from the focused sunlight.
The resulting image will be much brighter, sharper and larger than from a pinhole, since the telescope gathers more light, magnifies the image and allows to focus it properly. You might be able to see some solar surface details (such as sunspots) or even silhouettes of the lunar mountains during an eclipse - see examples below of projected solar images made during a partial eclipse of 2005 with a Bushnell 60mm spotting scope and a sheet of white paper.
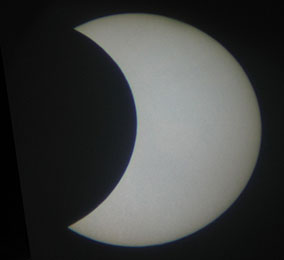
An example of image projected by a 60mm spotting scope during a partial solar eclipse
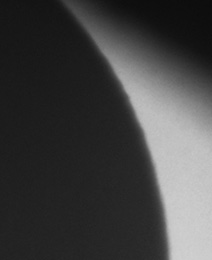
Hints of lunar mountain's silhouettes visible on the projected image
Observing the Sun with a Telescope
Even a small telescope gathers enough sunlight to harm your eyes
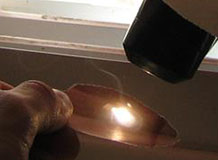
If you own a telescope and wish to observe the Sun directly through its eyepiece - you must use a full aperture solar filter which is mounted on the front side of the instrument. Looking directly into the eyepiece even briefly is dangerous and can result in permanent eye damage. A photo at right illustrates what even a small 60mm spotting scope can do to a piece of paper in a matter of seconds if pointed into the Sun. Also avoid using ocular (eyepiece) filters - the energy with is collected by objective can easily cause these filters to crack and expose your eye to concentrated sunlight. This doesn't include high end oclular H-alpha filters which are always used in a combination with specialized aperture energy blocking filters.
It is also important to use only filters or films which are intended for visual and not photographic use. Photographic filters might pass too much energy in invisible wavelengths (IR/UV) which might cause some damage to your sight without you even noticing.
Commercial film solar filter
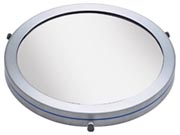
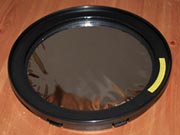
Commercial glass solar filter
White light solar filters are also commercially available and are fairly inexpensive (example of adjustable filter). There are filters which are made from a solar film and glass ones. The glass filters are more expensive and durable, but usually offer a much lower image quality (or are ridiculously expensive).
A cheaper (and often more versatile) option is to obtain a sheet of a special "white light" solar filter film and make the filter yourself. "Thin film" filters (such as Baader Astrosolar) offer higher optical quality than thicker polymer films (i.e. Thouthand Oaks model). Instructions which film manufacturers provide can be used to build a filter. Make sure that there are absolutely no gaps in the finished filter (you can test it in a dark room against a bright light source). Also ensure that the film is attached firmly to the filter mount, so it won't come off easily. When mounted on the telescope - make sure that the filter is tight and secure (I use masking tape to be certain, especially if it's a public event).
See an example of such DIY white light solar filter below. Note that I sandwiched the film between two plastic enclosures and cemented it, and added a soft tape lining on it's inner edge which makes it hold firmly when mounted.
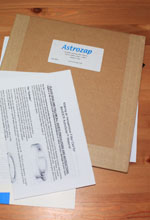
Astrozap film for making a white light solar filter
Home-made solar filter made from a film
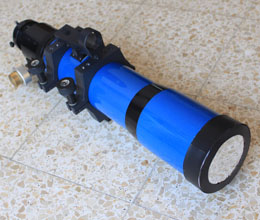
A refractor telescope with a white light filter is an excellent solar observing tool
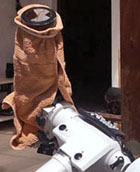
Wrapping the telescope can prevent overheating
While observing the Sun - make sure that the finder scope is covered with its cap. You can aim the telescope by pointing it into the Sun's general direction and then search with a wide angle eyepiece. Another alternative is making or buying a some sort of solar finder, such as the televue sol searcher.
During a hot day and prolonged observing sessions - consider covering the body of the telescope to prevent it from overheating. It can be as simple as wrapping a towel around.
Solar Filter Aperture
There are two opinions regarding aperture for solar observing: Small and large. To summarize - while a smaller aperture will provide steadier view, a larger one will occasionally "kick in" and provide finer details (especially during cold weather).
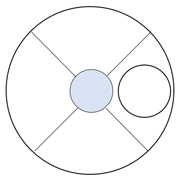
Off axis mask placement in a newtonian reflector
It is quite widely considered that you should have a clear aperture of no more than ~80-100mm for solar observing (like most dedicated solar telescopes). If you have a larger telescope - an aperture mask with a small round cutout can be used (some telescopes have it included in a dust cap, though it's usually smaller than ideal). In case of reflector - the mask should be off-axis and cover a clear section of the aperture.
The reason large apertures aren't usually used for solar observing is because during the day there is much more atmospheric turbulence than at night, which make it hard to utlize the resolving power of a larger instrument. Arguably - large apertures even degrade the image compared to small ones under these conditions. A possible explanations for that is that the heat rising from the ground causes convection and creates volumes with different refraction indices (which act as lenses). Large aperture is affected by such "lenses" at larger scales, while smaller one "ignores" them.
Despite that - some observers suggest using a full aperture filter even in large instruments. This allows to reveal finer solar detail (such as granulation) during steadier seeing, especially at the morning (or winter) when the ground is cold. I observed once a Venus transit with a 8" Newtonian with a full aperture white light filter, and was able to resolve the thin silver lining of the planet's atmosphere. I'm not sure it would be easily visible through a 80mm mask.
Photographing the Sun with a White Light Filter
While most of the photos of the Sun you see in the internet are made using expensive narrowband filters (see further section) - you can still make stunning images using a visual or a photographic white light filter. "White light" photos can reveal fine details in sunspots and even show features such as the granulation, if performed in good conditions and with a sufficient focal length.
The solar photography is quite similar to lunar astrophotography, except for the fact that we aren't using the largest available aperture. If you are using short focal lengths (a small refractor telescope or a telephoto lens) - a single frame image may suffice. At longer focal lenghts the blurring effects of atmospheric turbulence are more evident and you should consider making a series of short exposures or a movie clip. Individual frames can be combined using a software tool like Autostakkert, Registax or Avistack. The exposures should be as short as possible.
A photo of the Sun made with ASI120MM camera, 80mm refractor and a home-made white light filter
A DSLR camera attached to the telescope's prime focus or via eyepiece projection can be used to take a series of large individual frames (a result of such method can be seen in this image) or record a movie clip using a "cropped" mode or an external software (i.e. EOS Movierec).
Another, more advanced option, is to use a dedicated planetary camera (preferably monochrome) to capture a video clip for further processing - see an example above.
H-Alpha and Other Advanced Solutions
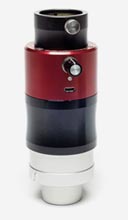
Daystar Quark
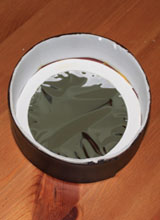
H-alpha filter
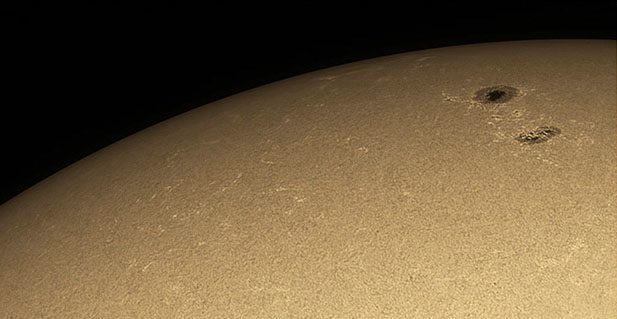
All of the filters mentioned above are so called "white light" filters which simply absorb most of the sunlight, evenly through the solar spectrum. This method allows us to view the Sun's inner layer called photosphere with its features (sunspots, granulation). It is characterized by so called "black-body" radiation which spreads over the whole visible spectrum. The view we get is quite static, and changes only over a period of hours and days.
The Sun's more outter later, the chromosphere, contains much more interesting features such as filaments and prominences, which can erupt and change in front of our eyes in a matter of minutes (or even less). The chromosphere's spectrum is dominated by emission lines, meaning it shines only in very specific colors (Hydrogen-alpha being the strongest, which gives it a reddish color). Since the chromosphere is also many magnitudes weaker than the photosphere - in order to observe it we need to block all the photosphere's energy and only let the desired wavelength in.
This is performed by using a specialty narrowband filters (usually H-alpha) or telescopes which have them built-in. The prices for these instruments starts from 600-1000$ for the cheapest models (Daystar Quark and Coronado PST). In addition to H-Alpha there are wavelengths such as Calcium-K which allow us to see different Sun's layers, and different settings for these filters which allow you to focus on specific features.
Conclusion
If you need to know whether there are solar features which are currently worth observing, such as a large sunspot group, you may use the Spaceweather site which provides a current image of the Sun. And no matter which method you choose - you should remember that a telescope pointed to the Sun always requires caution and should not be left unattended if there are children around.